Amy M. Burns

Elementary Music Technology and Integration

Amy M. Burns has taught PreK-grade 4 general music for over 25 years at Far Hills Country Day School (FH) (https://www.fhcds.org/). She also teaches grade 5 instrument class, directs the FH Philharmonic, is the Performing Arts Department Manager, and teaches privately in the after-school conservatory after being the director for over 20 years. She has authored four books and numerous articles on how to integrate tech into the elementary music classroom. She has presented many sessions on the topic, including four keynote addresses in TX, IN, St. Maarten, and AU. She is the recipient of the 2005 Technology in Music Education (TI:ME) Teacher of the Year, the 2016 New Jersey Music Educators Association (NJMEA) Master Music Teacher, the 2016 Governor’s Leader in Arts Education, and the 2017 NJ Nonpublic School Teacher of the Year Awards. Her most recent publication, Using Technology with Elementary Music Approaches (2020), published by Oxford University Press (OUP) is available from OUP and Amazon. Burns is also the Community Coordinator for Midnight Music (MMC) at https://midnightmusic.com/, the General Music Chair for NJMEA Board of Directors, and the Elementary Music Consultant for MusicFirst (https://www.musicfirst.com/), a company built by music educators for music educators, dedicated to helping music teachers and their students make the most of technology in the classroom.

Filtering by Category: Seesaw

Creating Interactive Activities for Assessment and Creativity

The pandemic caused more technology to be introduced into every subject area. Some of this technology has a lot of benefits for elementary music classes. Especially those that foster creativity and those that provide assessments.

This week’s episode shows how to use multiple apps that are mostly free to create interactive activities that promote creativity and assessment. Learn how to use Canva, Google Slides, Seesaw, or Interactive Whiteboard apps to create amazing manipulatives, interactive assessments, and creative musical activities.

Resources

Blog: http://amymburns.com/elmusedtech/creativeactivities

Shareable Zip File: Creating Interactive Activities for Assessment and Creativity Zip File

Canva. (2022, March 1). [archive] free media license agreement - CANVA. [Archive] Free Media License Agreement. Retrieved July 31, 2022, from https://www.canva.com/policies/free-media-license-agreement-2022-01-03/

Flat for Education: https://flat.io/edu

Canva for Education: https://www.canva.com/education/

Seesaw: app.seesaw.me

Midnight Music Free Notation Files: https://midnightmusic.com/2013/06/the-big-free-music-notation-image-library/

Mote Extension: https://chrome.google.com/webstore/detail/mote-voice-notes-feedback/ajphlblkfpppdpkgokiejbjfohfohhmk?hl=en-US

Midnight Music Clipart Body Percussion Library: https://midnightmusic.com/2020/12/midnight-musics-body-percussion-clipart-library/

Read More

We Are Dancing In The Forest Kodály and Orff Schulwerk Inspired Play-Along (Boomwhackers, Percussion, Recorder, and Ukulele) and Manipulatives

This is the fifth installment of my summer project of creating play-along videos of songs and concepts found in the Kodály and Orff Schulwerk approaches. This week, I feature We Are Dancing In The Forest Play-Along (Boomwhackers, Percussion, and Recorder) video.

Each video (found on my YouTube page) will be accompanied by lesson manipulatives. The lesson manipulatives can be found on my Teachers Pay Teachers page starting in September (these free manipulatives are now showing up on my TPT page). Up until then, you can have them for free (as seen below and beginning to show up on my TPT page). This gives you the opportunity to use the video for free to work well with your classroom approach or purchase the lesson that goes along with the video on my TPT page. Either way, the videos are free to use in your classroom.

Google slides: https://docs.google.com/presentation/d/1fHjgrbaRpyIiBY6aLjXf0XuRk8G-96EGEj94rr9w2_w/copy

PDF File: https://drive.google.com/file/d/10_7A9PKoapFKYa7ZvIojoJ55OizNpaY9/view?usp=sharing

Seesaw Activity: https://app.seesaw.me/pages/shared_activity?prompt_id=prompt.49b4ebe7-65bd-48d8-802f-a95ce1a54873&share_token=DmycA2--QjqHlOUx6gERkw

YouTube Play-Along Video: https://youtu.be/hCwj2SRlunY

Read More

Teddy Bear Play-Along Video and Manipulatives

This is the third installment of my summer project of creating play-along videos of songs and concepts found in the Kodály and Orff Schulwerk approaches. This week, I feature the Teddy Bear Play-Along video to go with the retrieval practice worksheet (https://drive.google.com/file/d/1zN-cwSbWZ_7aS1uhQ97olGHVgWJqUCaE/view?usp=sharing) that I posted earlier this week.

Read More

Countdown to 2022: 5 Free Tech Activities for #Elmused (#3) Google Slides or Seesaw Retrieval Practice or Assessment in Rhythm Literacy

Here in the Northeast of the States, the holiday started with an outbreak of the Omicron variant of Covid. This caused schools to pivot their current plans and weigh the options of remote learning, concurrent learning, or live learning with more restrictions. This week, to bring us into 2022, I am going to blog and share daily activities that can be used in your adapted #elmused classroom when returning from the holiday break.

#3: Puzzle Rhythm Play-Along Patterns

In November, I created a “Be Thankful” Rhythm Play-Along Activity. This Seesaw and Google Slides Project accompanied the video to serve the purpose of retrieval practice or assessment.

Google Slides: Be Thankful Rhythm Play-Along Retrieval Practice or Assessment

This google slides activity involves a puzzle for the students to solve. Once they solve the puzzle, they are to use the Mote Extension (https://chrome.google.com/webstore/detail/mote-voice-notes-feedback/ajphlblkfpppdpkgokiejbjfohfohhmk?hl=en-US) to record themselves performing the rhythm pattern. Once they have completed eight slides, they can press play and perform with the Be Thankful Rhythm Play-Along. Although this video was from Thanksgiving, it can be used throughout the year.

Seesaw: Being Thankful Rhythm Play-Along Retrieval Practice or Assessment

Very similar to the google slides activity, this Seesaw Activity uses the microphone tool to record themselves performing the rhythm pattern that they create from piecing the puzzle together. Once finished, they can press play on the ninth slide to perform all of the rhythm patterns with the rhythm play-along video.

Resources

Google Slides: https://docs.google.com/presentation/u/1/d/1XWZYsa-Mu7-Qcb7rT3u8h7dWxxDrOzJ0R19dU-nQsPg/copy

Seesaw: https://app.seesaw.me/pages/shared_activity?share_token=-163i544RUCMX3aV1K7nAg&prompt_id=prompt.a6088603-e514-4177-9e60-d06a771c261e

Check back as we count down to 2022 with #2 tomorrow!


Note: At the 5 min mark I say that google slides is much easier. However, Seesaw is what was supposed to be referenced at that 5 min mark.

Trepak from Tchaikovsky's The Nutcracker: Rhythm Play-Along

In this play-along video, the students will practice half notes, half rests, quarter notes, and eighth notes in duple meter. This is a great tool for the practice portion of Kodály's prepare/present/practice approach. Here is a link to the process of creating this video using free tools: https://youtu.be/IrEfOhZK-1w

Best of Pandemic #Elmused Tech Episode 5: Seesaw

Seesaw (web.seesaw.me) has been an amazing tool during the pandemic for music educators. Many of us used it before the pandemic, but when the lockdown occurred, numerous schools assigned Seesaw as a platform for #elmused to use to teach music. It consists of numerous tools to enhance advocacy, teaching, showcasing items, and so much more. Here are some examples of how Seesaw can continue to be used post-pandemic.

Advocacy

Seesaw has the capability of connecting the students’ journals with the students’ caregivers and families. It shows the families that music is more than concert preparation as you can add videos from class to their journals, showcase their assessments, their retrieval practices, and more. It delivers this all to the families’ mobile devices. And, you, the music educator, are the gatekeeper that allows what items can be posted for the families to see.

Seesaw Activities

There is a library of 100s to 1000s of lessons/activities that are made by educators for other educators to use. By performing a search, you can find many music activities filtered by grade level. These activities range the gamut from note reading to recording themselves singing.

Tools

Seesaw provides the students with various tools to help them respond to activities or to post to their journals using multiple modalities. These tools are recording audio, recording video, screen recording, adding links, adding pictures, taking notes via writing or audio, uploading videos/audio/pdfs/jpgs, and using a drawing tool that integrates the other tools into it. It gives the student a platform for them to reflect, express, and learn in a way that works well for them to succeed. It also helps you by giving your shyest student a safe place to record a solo. Plus, if you need recordings for virtual performances, Seesaw can be a tool to acquire those recordings.

Pricing

Seesaw is free+. You can begin with the free version and do all of what I stated above. To upgrade to Seesaw Plus (individual subscription) or Seesaw for Schools (where the school pays per student) gives you more activities to save, more classes to use it with, and allows you to keep track of the students’ progress.

Seesaw Courses

Seesaw is currently holding its annual conference, Seesaw Connect, from July 26-August 13. There are sessions available for all and mini-courses only available to Seesaw Learning Community (which involves becoming a Seesaw Pioneer, Ambassador, or Certified Educator). One of the sessions available for all is one I created titled, “Elementary Music + Seesaw = Success!”. Check it out today!

I am also running a Seesaw for Music Teachers Course through Midnight Music, which can be taken, asynchronously, at your own pace and timing.

“Best of the Pandemic #Elmused Tech” Episode 2: “Once you go Canva, you never go back!”

These exact words, “Once you go Canva, you never go back!” were stated by a Midnight Music Community member about the graphic design program, Canva. I 100% agree with the statement as Canva is intuitive to use, updates often, and improves often, is free for educators*, and creates amazing visuals, manipulatives, activities, and more. For those of us like me, where your ability goes to the extent of being able to create likable stick figures for your manipulatives, Canva gives you a blank canvas or templates and numerous artistic tools that you can use in an educational setting. They make your simple manipulatives look like beautiful pieces of art!

Canva + Seesaw = Beauty!

Using Canva to create the background images for your Seesaw activities (or other platforms like Google Slides, Keynote, PowerPoint, etc) makes it nicer for you because you do not have to create it all in Seesaw. You can add the moveable items in Seesaw when you have created the background image in Canva. Also, by doing so, you can use that image in other programs whereas, if you create it from scratch in Seesaw, it is not always usable in or quick to download to other programs.

To create some background images for a Seesaw Activity, here is a step-by-step process for a call-and-response assessment activity using the song “No More Pie.” Here is a version of the song found at Beth’s Notes: https://www.bethsnotesplus.com/2014/01/call-and-response-songs.html

This song is a traditional folk song. I did adapt it for two reasons. 1) I took out the trainwreck verse as I teach in a town where much of the population commutes via train and there have been trainwrecks on the lines. I wanted to be thoughtful of that and took that line out. If you want to keep the line in, use the process below to create and add it to the activity. 2) I changed “Bread’s too brown” to “Bread has a frown” for professional reasons. You, again, can use the process below to change it back to the original version.

Figure 3

Canva to Seesaw Activity: Process

Figure 1

Figure 2

Figure 4

  1. Launch Canva*

  2. Choose “Create a Design” —> Presentation (see fig 1)

  3. On the right side, click on “Photos” and put in the search bar, “empty pie” (see fig 2)

  4. When you find a picture that you like, you can click on it and Canva will add it into the slide, where you can resize it and crop it. Or, you can click and drag it until you see it take up the entire slide (see fig 3).

  5. Do this same step for the rest of the phrases of the song.

  6. For the speech bubble, click on the “Elements” and place “speech bubble” in the search bar. The elements are where you will find your shapes, your lines, many cartoon-type images with transparent backgrounds, and so much more.

  7. To place text on the slide, for example, the directions or lyrics, click on the “Text” tool and choose a text template that works best for you. You can always change it as you work on the activity.

  8. To create the icons that you see in the speech bubble (see fig 4), I took screenshots of those tools from Seesaw and removed the background to make them transparent (see tips below).

Adding the Canva Slides to a Seesaw Activity

Figure 5

To bring the Canva slides you created to the song, “No More Pie”, click the download button (which is an underlined arrow ) and scroll down to “Download”. Since you want to download all 16 pages of the song and you do not need the backgrounds to be transparent, the png file that it is defaulting to will work well. However, Canva does give educators the option to download with transparent backgrounds, download certain pages instead of all of them, choose the file format (png will be of a higher quality than jpg), and compress the file or save the settings (see fig 5).

Once you have downloaded the pages, you can do the following:

Figure 6

Figure 7

  1. The file downloaded from Canva is a zip file. Click on it to open up the folder with the 16 separate png files.

  2. Launch Seesaw (Seesaw has a free account or a paid subscription).

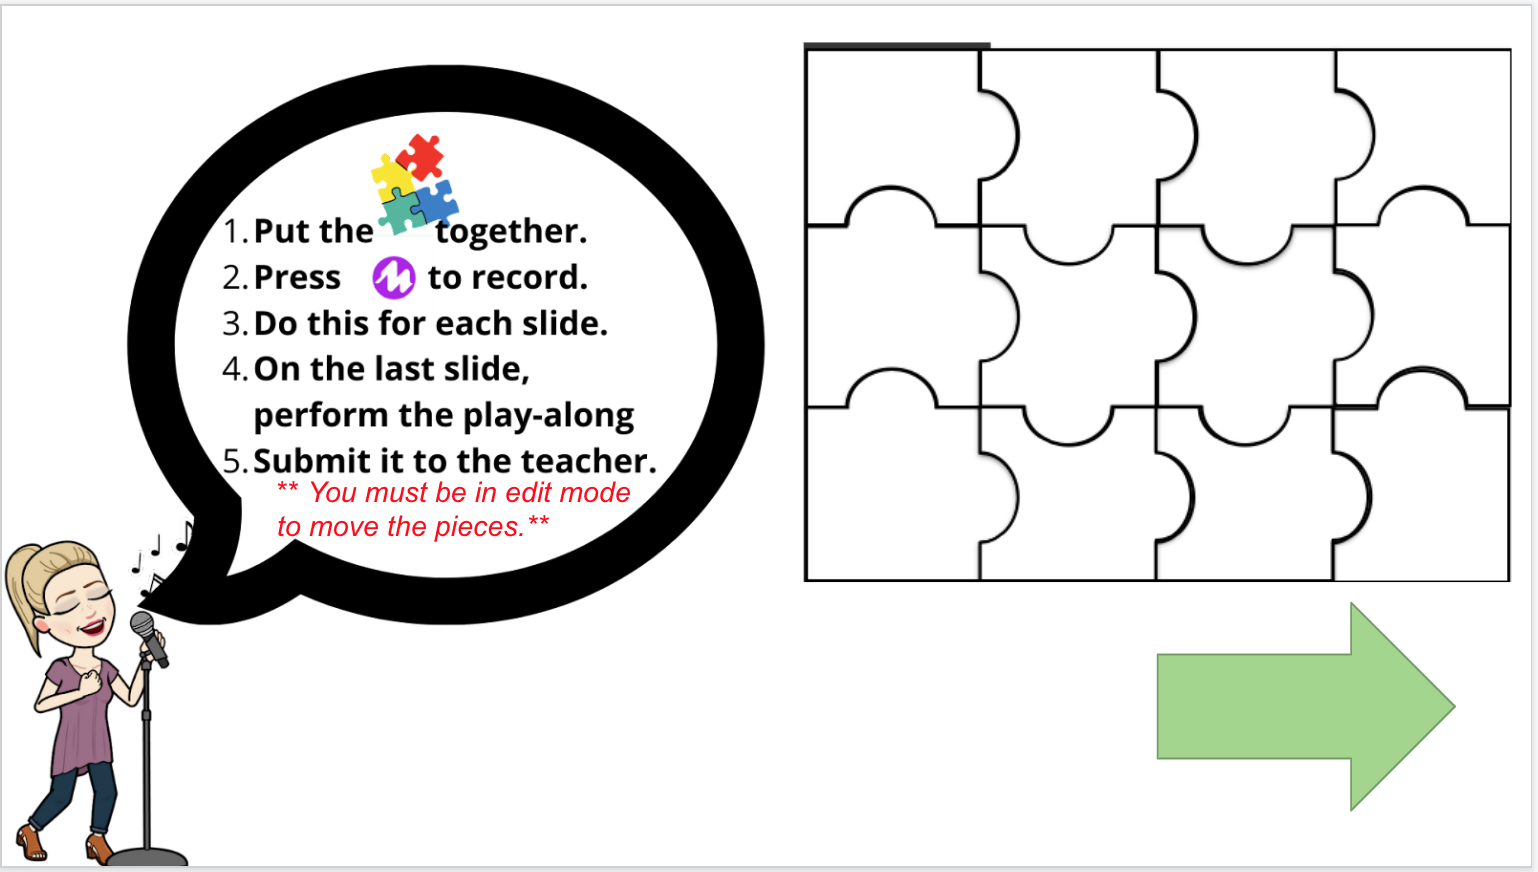
  3. Assuming you have set up a class, click the green + button and scroll down to “Assign Activity” (see fig 6).

  4. Click “Create New Activity”.

  5. Click “Add Template for Student Responses”. This will be where the students record their responses in the call and response song.

  6. Click “Upload” (see fig 7).

  7. Highlight the first 10 files in the Canva folder that you downloaded and drag them onto the screen. Seesaw will allow the subscribers to upload 10 png files at one time. They will create 10 slides and all of the images will be locked onto the screen. Since this activity will have 16 slides, you can manually and individually add the final six png files to each slide (see fig 8). Seesaw currently cannot exceed 20 slides in an activity for paid subscribers. The free version will only allow 1 slide per activity.

Figure 8

Once all of the png files were separate slides, I added the arrows from Seesaw’s shape tools (click … and “Shapes”). I linked the arrows so that they would advance to the next slides. This is done by clicking on the object, like the arrow, click the …, click “link”, click “Link to Page”, and then click “Next”. This will make your arrow advance to the next slide when clicked. I added a house on the last slide using the shape tools so that when you click the house, it brings you back to the first slide.

To Add the Audio

There are two ways to add the audio:

Figure 9

  1. Click the … on the right side, scroll over to “Record Voice” and sing the calls onto the slides.

  2. Use a free digital audio workstation like Soundtrap, Bandlab, GarageBand, etc, and create a track to record yourself singing the call. I created a track for each call and downloaded them individually. I then uploaded them onto each page by clicking the … on the right side, scroll over to “Upload Audio”, and find the audio file on my device or the cloud.

  3. Both ways will produce a text box with the word “Listen” automatically added to the audio file. You can replace “Listen” with different words like “Call” or for this activity, I left it blank and placed it over the lyrics (see fig 9).

Figure 10

Finally, Click the ✅ to save the template for responses. I then add the instructions using emoji icons or the Seesaw Shortcut List, sometimes add a multimedia example, which is a video showing how to perform the activity that I created with the free version of Loom, and record myself stating the instructions. I will finish up with the Teacher’s Notes to explain the age level for the activity and some of the tips to help it be successful in the classroom (see fig 10).

Google Slides Activity

Figure 11

To create this in Google Slides, download the Canva slides as you did in Seesaw. Launch Google Slides and add them as background images by using a blank slide, clicking “Background”, then “Choose Image”, and finding the image on your device or in Google Drive, and finishing by clicking “Done” (see fig 11).

To add the arrows, click on the shapes tool, scroll down to “Arrows”, and find the arrow pointing to the right. Make the arrow black by finding the “Fill color” tool and choosing black. To link the arrow to the next slide, click on the arrow, then click on the link icon at the top of the menu, click on “Slides in this presentation”, click on “Next Slide”, and click on “Apply”.

To change the directions on the first slide, I use the shapes tool to create a box. I place the box over the original Seesaw directions. I then double-click on the box, which turns it into a text box. I write new instructions that are geared for Google Slides.

Figure 12

To add the audio, take the downloaded audio files and add them to a folder in your Google Drive. Click on the “Insert” menu in Google Slides and scroll down to “Audio”. Find the file in Google Drive and click on it. It is now inserted into the slide and I then move it next to the lyrics (see figures 12 and 13). I also add audio of me reading the instructions onto the first slide.

Figure 13

To Have Students Sing the Response

You can perform this activity live, but you still want to be able to have them record their responses. You can do this by assigning the google slide deck into their google classroom so that they each receive a copy, or share the file with them as a forced copy (change the end of the shared link from “edit” to “copy”). Use the extension Mote, found at https://chrome.google.com/webstore/detail/mote-voice-notes-feedback/ajphlblkfpppdpkgokiejbjfohfohhmk?hl=en-US, so that the students can record themselves singing the responses and adding them to the slide (see fig 14).

Figure 14

Canva Tips

Here are some tips to assist you when using Canva in this way:

  • Remove the background of a picture: In the educators version of Canva, you can click on a picture, click on effects, and then click on “Background Remover”.

  • If you cannot remove the background in Canva, then upload the image to remove.bg and download the image with the removed background and upload it to Canva.

  • When you export your slides from Canva, there is the opportunity there to click the “Transparent Background” box. This will download your slides as individual png files with transparent backgrounds. If this option is not available in your Canva app, use remove.bg to make the backgrounds transparent.

  • There is an option to add Audio to your Canva slides. However, currently, it is like adding a soundtrack. Therefore, when I explored this option, it added one sound file to play across all slides. For this activity, using the audio option was not ideal.

  • Canva can integrate other apps into its program such as Facebook, YouTube, Instagram, and Bitmoji, to name a few. Therefore, you can quickly and easily add your Bitmoji to any of your Canva designs. You can also access your photos and videos from Facebook, YouTube, and Instagram directly into your Canva slides.

Want to Learn More About How to Use Canva and Seesaw?

Midnight Music is currently hosting two PD, self-paced courses over the next two months:

An online course for teachers who want to create amazing teaching resources for their classroom – fast.

This course will show you how to use Canva (a fantastic, FREE online design tool) to make posters, worksheets, images, short videos, social media posts, clipart, gifs, and more!

An online course for teachers who want to learn how to create interactive music activities and manage student work effectively.

Check back next week for another episode of “Best of the Pandemic #Elmused Tech”, which can be found on my YouTube channel with the thorough blog post found here.

Resources

Canva has a free version seen here on their website. They also have a free educators version that you can apply to use that has more visuals and effects.

“Best of the Pandemic #Elmused Tech” Episode 1: Kindergarten and Grade 1 Assessment-Five Voices

“Best of the Pandemic #Elmused Tech” Episode 1: Kindergarten and Grade 1 Assessment-Five Voices

his week’s YouTube episode explored assessing the five voices of young students. In a variety of standards or Grade Level Objectives (GLOs) or Student Learning Objectives (SLOs), many music educators have to prove that the students are learning in music class. This can be done with data-driven assessment tools like pre- and post-tests. However, if your students are young readers, and written forms of pre- and post-testing would not be ideal, how can we use the technology we acquired and learned from teaching during a pandemic, for assessing young learners?

One way is to use the learning management systems (LMS) or digital tools the school had you use this past year to create the assessment. This way, when you need to collect the assessment, it is stored all in one place and you can retrieve it at any time. Plus, many of these tools allow you to format and organize them in ways so that you can quickly present the data to administrators.

Here are two ways to collect data about the students’ knowledge of the five voices: speaking, singing, calling, whispering, and inner voices. This can be done at the beginning of the year and then done again at the end of the year to be able to see and record the learning data.

Seesaw Activity

If your students are using Seesaw, then you can assign the activity to the students. This activity has pre-recorded instructions and examples so that you do not need to recreate the wheel. However, you can make a copy of the activity and add your own voice to the instructions and examples. To create this activity:

1. Launch Seesaw and login

2. Click +

3. Click “Assign Activity”

4. Click “Create New Activity”

5. I then add the student template.

6. I use Canva to create the template so that it looks good and pleasing to the eye. In Seesaw, I added the words, “Speaking, Singing, Whispering, Calling, and Inner Voice”. I did this separately so that I could add the audio to the word.

7. I can record up to 20 audio examples onto one slide in an activity. When I do this, I can record directly by clicking on the … and the 🔈 and record directly into the slide. I can also use a free online digital audio workstation like Soundtrap and record myself singing and speaking. I then can download the audio and upload it to Seesaw. I like doing it this way because if you are using the web-based version of Seesaw, and you record directly into the program, you hear the clicks from turning on and off the microphone.

8. Once finished, I like to place my bitmoji onto the slide and use the shapes tool in Seesaw to create a speech bubble. That is where I will write the instructions.

9. I click the green check to save the activity template. I then add the same instructions to the “student instructions” box and name the activity.

10. I click save and I can assign the activity by assigning it to a class or by sharing the student link to their LMS.

Google Slides

The process is similar as I download the Canva slide and upload it to google slides as a background. I take the audio files I created in Soundtrap and add them to my google drive. I then click “Insert” and scroll down to “Audio”. From there, I choose the audio files I need for the file.

Since there is no drawing tool in google slides, we use the line tool to match the voice with the word.

Everything is set up for young readers to be successful as they can click the audio tools to listen to the instructions, to hear the word of the voice, and to hear the example of the voice. I would highly suggest exampling the activity first with using the “Sample Student” in Seesaw or creating the forced copy in Google Drive.

Tip: Since sharing audio files within google slides can be a slippery slope, I have included the folder with the audio files in the shared links below.

Come back soon!!!

Check back each week during the months of June-August as I will be giving quick PD tips on how to take the “Best of the Pandemic Tech” and use it practically and intuitively in your teaching scenario for this upcoming or current school year.

Links:

©2024 amymburns.com

Any info, student examples, pictures, graphics, etc, may be used with permission. Please contact me personally before using any info, student examples, pictures, graphics, etc.